Docker Multi-Stage Builds: Smaller Images, Faster Deploys
A hands-on tutorial for Docker multi-stage builds covering Go, Node.js, and Java examples with security hardening, caching strategies, and CI/CD integration for production deployments.
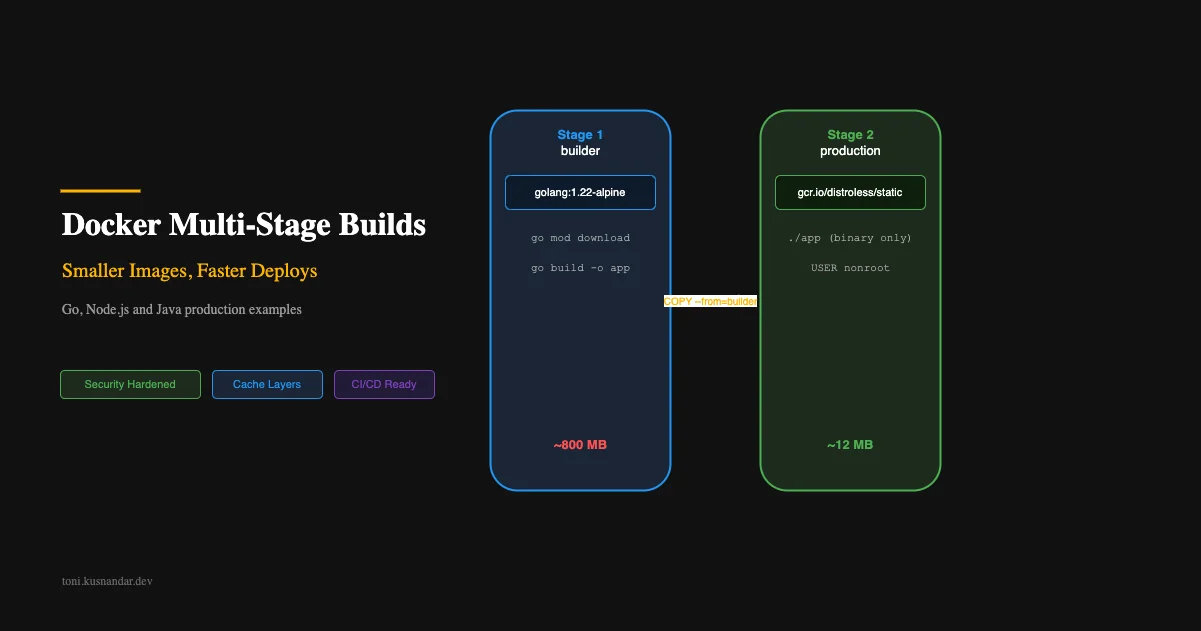
I review Docker images from client projects regularly. The pattern is always the same: a 1GB+ image containing the entire build toolchain, dev dependencies, source code, and test fixtures. All running as root. In production.
Multi-stage builds solve this problem completely. You build in one stage with all the tools you need, then copy only the final artifact to a minimal runtime image. The result: smaller images, faster deploys, better security.
This is one of the highest-leverage DevOps improvements you can make. 10 minutes of Dockerfile changes can reduce your image size by 90%+ and cut deployment time significantly.
If you are newer to Docker and want to understand why containers exist before optimizing them, What Docker Actually Solves covers the foundational concepts, environment drift, the image-as-deployment-unit mental model, and Docker Compose for local development.
Why Image Size Matters
Before the how, let me convince you of the why:
Pull time. ECS Fargate pulls your image on every new task launch. A 1.2GB image takes 30-45 seconds to pull. A 12MB image takes under 2 seconds. That is 30+ seconds added to every scale-out event and deployment.
Security surface. Every package in your image is a potential vulnerability. The golang:1.22 base image has 200+ packages, many with known CVEs. A distroless image has ~5 packages.
Storage cost. ECR charges for stored image bytes. 10 versions of a 1.2GB image: 12GB stored. 10 versions of 12MB: 120MB. Not a huge cost difference, but it adds up.
Build speed. Smaller images push faster to the registry. Your CI/CD pipeline completes sooner.
| Image Base | Typical Size | Packages | Known CVEs |
|---|---|---|---|
| golang:1.22 | 1.2GB | 200+ | 30-50 |
| node:20 | 1.1GB | 400+ | 50-80 |
| eclipse-temurin:21 | 450MB | 150+ | 20-40 |
| alpine:3.19 | 7MB | 15 | 0-2 |
| distroless/static | 2MB | 5 | 0 |
| scratch | 0MB | 0 | 0 |
Multi-Stage Build Concept
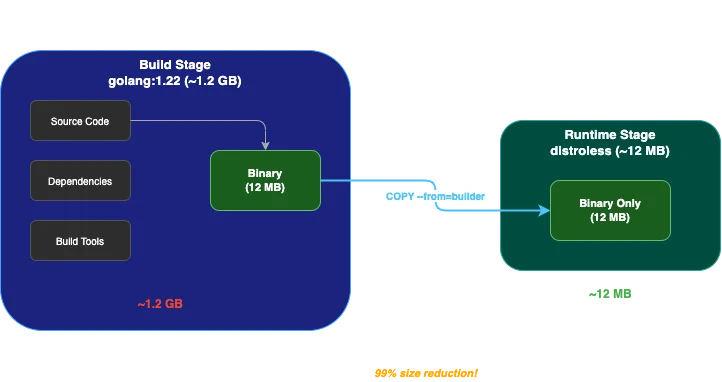
The core idea is simple: use one image for building, another for running.
# Stage 1: BUILD (has everything needed to compile)
FROM golang:1.22 AS builder
# Install deps, compile code
RUN go build -o /app

# Stage 2: RUNTIME (has only what is needed to run)
FROM gcr.io/distroless/static
# Copy just the compiled binary
COPY --from=builder /app /app
ENTRYPOINT ["/app"]
The final image contains only the runtime stage. Build tools, source code, and intermediate artifacts are discarded. Docker keeps the builder stage cached locally for future builds but does not include it in the output.
Example 1: Go Binary from 1.2GB to 12MB
This is the Dockerfile I use for every Go service:
# ============ Build Stage ============
FROM golang:1.22-alpine AS builder

WORKDIR /src

# Cache dependencies (this layer rarely changes)
COPY go.mod go.sum ./
RUN go mod download && go mod verify

# Build the binary
COPY . .
RUN CGO_ENABLED=0 GOOS=linux GOARCH=amd64 \
    go build \
    -ldflags="-w -s -X main.version=$(git describe --tags --always)" \
    -trimpath \
    -o /src/bin/api \
    ./cmd/api

# ============ Runtime Stage ============
FROM gcr.io/distroless/static-debian12:nonroot

# Copy binary and any required files
COPY --from=builder /src/bin/api /api
COPY --from=builder /src/migrations /migrations

EXPOSE 8080

USER nonroot:nonroot

ENTRYPOINT ["/api"]
Build flags explained:
CGO_ENABLED=0: Static binary, no C library dependency-ldflags="-w -s": Strip debug info and symbol table (20-30% smaller binary)-trimpath: Remove local file paths from binary (security)GOARCH=amd64: Explicit target architecture
Runtime base explained:
distroless/static: Contains CA certificates and timezone data, nothing elsenonroot: Runs as non-root user (UID 65534)- No shell, no package manager, no way to exec into the container
Result: 1.2GB build image produces a 12MB runtime image.
Example 2: Node.js App from 1GB to 150MB
Node.js is trickier because you cannot compile to a single binary. You need the Node.js runtime and production dependencies:
# ============ Build Stage ============
FROM node:20-alpine AS builder

WORKDIR /app

# Install ALL dependencies (including devDependencies for building)
COPY package.json package-lock.json ./
RUN npm ci

# Copy source and build
COPY . .
RUN npm run build

# Remove devDependencies after build
RUN npm prune --production

# ============ Runtime Stage ============
FROM node:20-alpine AS runtime

# Security: create non-root user
RUN addgroup -S appgroup && adduser -S appuser -G appgroup

WORKDIR /app

# Copy only production dependencies and build output
COPY --from=builder /app/node_modules ./node_modules
COPY --from=builder /app/dist ./dist
COPY --from=builder /app/package.json ./

# Security hardening
USER appuser
ENV NODE_ENV=production

EXPOSE 3000

CMD ["node", "dist/main.js"]
Key optimizations:
npm ciinstead ofnpm install: deterministic, faster, respects lockfilenpm prune --production: removes devDependencies after build- Only copy
node_modules,dist, andpackage.jsonto runtime
Result: 1.1GB build image produces a ~150MB runtime image.
For even smaller, consider using node:20-alpine as runtime or exploring experimental Node.js single-executable applications.
Example 3: Java Spring Boot with jlink
Java apps are notorious for large images. Using jlink to create a custom JRE cuts the runtime size dramatically:
# ============ Build Stage ============
FROM eclipse-temurin:21-jdk-alpine AS builder

WORKDIR /app

# Cache Gradle/Maven dependencies
COPY build.gradle.kts settings.gradle.kts ./
COPY gradle ./gradle
RUN ./gradlew dependencies --no-daemon

# Build the application
COPY src ./src
RUN ./gradlew bootJar --no-daemon -x test

# Create custom JRE with only needed modules
RUN jlink \
    --add-modules java.base,java.logging,java.sql,java.naming,java.management,java.instrument,java.desktop,java.security.jgss,jdk.unsupported \
    --strip-debug \
    --no-man-pages \
    --no-header-files \
    --compress=2 \
    --output /custom-jre

# ============ Runtime Stage ============
FROM alpine:3.19

# Install minimal required packages
RUN apk add --no-cache tini

# Copy custom JRE
COPY --from=builder /custom-jre /opt/java

# Copy application
COPY --from=builder /app/build/libs/*.jar /app/app.jar

# Security
RUN addgroup -S app && adduser -S app -G app
USER app

ENV PATH="/opt/java/bin:${PATH}"
ENV JAVA_OPTS="-XX:+UseContainerSupport -XX:MaxRAMPercentage=75.0"

EXPOSE 8080

ENTRYPOINT ["tini", "--"]
CMD ["java", "-jar", "/app/app.jar"]
jlink magic: Instead of including the full 300MB JRE, jlink creates a custom runtime with only the modules your app uses. Typically reduces JRE from 300MB to 50-80MB.
Result: 450MB build image produces a ~120MB runtime image (vs 450MB+ without jlink).
Security Hardening
Beyond size reduction, multi-stage builds enable security best practices:
Non-Root User
Never run containers as root in production:
# Create user in the runtime stage
RUN addgroup -S appgroup && adduser -S appuser -G appgroup
USER appuser
For distroless, use the built-in nonroot user:
FROM gcr.io/distroless/static:nonroot
USER nonroot:nonroot
Read-Only Filesystem
Prevent runtime modification of the filesystem:
# In ECS task definition or docker-compose
services:
  api:
    read_only: true
    tmpfs:
      - /tmp  # Allow temp files if needed
No Shell Access
Distroless images have no shell. Attackers who gain container access cannot execute commands:
# scratch and distroless have no shell
FROM gcr.io/distroless/static
# No /bin/sh, no /bin/bash, no way to exec into this container
Minimal Capabilities
Drop all Linux capabilities except what your app actually needs:
# docker-compose or ECS task definition
security_opt:
  - no-new-privileges:true
cap_drop:
  - ALL
Caching Strategies for Faster Builds
Layer Ordering
Docker caches layers top-down. Put rarely-changing layers first:
# GOOD: dependencies change less often than source code
COPY go.mod go.sum ./       # Layer 1: deps (cached unless go.mod changes)
RUN go mod download         # Layer 2: download (cached with Layer 1)
COPY . .                    # Layer 3: source (changes every commit)
RUN go build                # Layer 4: build (always rebuilds)
# BAD: copying source first invalidates dependency cache
COPY . . # Every code change invalidates ALL layers below
RUN go mod download
RUN go buildBuildKit Cache Mounts
BuildKit cache mounts persist build caches across builds without including them in the image:
# syntax=docker/dockerfile:1

FROM golang:1.22-alpine AS builder

WORKDIR /src
COPY go.mod go.sum ./

# Cache Go modules across builds
RUN --mount=type=cache,target=/go/pkg/mod \
    go mod download

COPY . .

# Cache build artifacts across builds
RUN --mount=type=cache,target=/go/pkg/mod \
    --mount=type=cache,target=/root/.cache/go-build \
    CGO_ENABLED=0 go build -o /src/bin/api ./cmd/api
For Node.js:
# syntax=docker/dockerfile:1

FROM node:20-alpine AS builder
WORKDIR /app
COPY package.json package-lock.json ./

# Cache npm packages across builds
RUN --mount=type=cache,target=/root/.npm \
    npm ci

COPY . .
RUN npm run build
Cache mounts reduce build times by 50-80% for subsequent builds because downloaded dependencies persist.
Integration with CI/CD Pipelines
In your GitHub Actions pipeline, enable BuildKit and use caching:
- name: Set up Docker Buildx
  uses: docker/setup-buildx-action@v3

- name: Build and push
  uses: docker/build-push-action@v5
  with:
    context: .
    push: true
    tags: ${{ steps.login-ecr.outputs.registry }}/my-api:${{ github.sha }}
    cache-from: type=gha
    cache-to: type=gha,mode=max
The type=gha cache uses GitHub Actions cache storage. Builds after the first one reuse cached layers, cutting build time significantly.
Debugging Multi-Stage Builds
When something goes wrong, you need to inspect intermediate stages:
Build a specific stage
# Build only the builder stage
docker build --target builder -t my-api:builder .

# Exec into it to investigate
docker run -it my-api:builder /bin/sh
Check what is in your final image
# See layer sizes
docker history my-api:latest

# Inspect filesystem
docker run --rm my-api:latest ls -la /
Use dive for layer analysis
# Install dive: https://github.com/wagoodman/dive
dive my-api:latest
Dive shows you exactly what each layer added and whether any files are wasted space.
Production Checklist
Before deploying a multi-stage Docker image to production:
- Final image uses non-root user
- No build tools in runtime image (no gcc, no make, no npm)
- No source code in runtime image
- No test files or fixtures in runtime image
- CA certificates available (for HTTPS calls)
- Timezone data available (if needed)
- Health check endpoint works
- Graceful shutdown handles SIGTERM
- Image scanned for vulnerabilities
- Image size under 200MB (ideally under 50MB for Go)
- Build is reproducible (pinned base image tags)
Image Size Summary
| Language | Before Multi-Stage | After Multi-Stage | Reduction |
|---|---|---|---|
| Go | 1.2GB | 12MB | 99% |
| Node.js | 1.1GB | 150MB | 86% |
| Java (Spring Boot) | 450MB | 120MB | 73% |
| Python | 1.0GB | 200MB | 80% |
| Rust | 1.5GB | 8MB | 99% |
The investment is minimal: 30 minutes to restructure your Dockerfile. The payoff compounds on every deploy, every scale event, and every security scan.
If you are running containers as part of your DevOps practice for a small team, optimized images are one of the highest-ROI improvements you can make.
Need help optimizing your container pipeline or setting up production Docker builds? Check out my DevOps support service where we audit and improve your build and deployment process.
See these build patterns used across production deployments in my backend and DevOps portfolio and Go gRPC service project.